If you decided that you liked to mess around with polymer clay, you might consider methods to learn more about it. While there are a range of books out there (your local library will have some), online tutorials, websites, if you encounter any problems then you are left asking around on forums.
So, it is worth paying for lessons. There are some who run online courses and others who teach in person. I am planning to become the latter.
My main reason for wanting to become a teacher, is actually to get to know new people. I know that there are a lot of teaching roles where you are not allowed to make friends with the students, but since this is a adult teaching adults and there is not any big power difference, then this is fine.
Having a lot of long term health problems prevent me from getting out and about, so I don't get to meet people that way. Since I work for myself from home, that takes away all the people who we meet through work. I am not Billy no mates by any means, but I think I really need to work at that part of my life.
I have looked around the UK and found that there are quite a few teachers out there, but none of them are in Surrey and there is no clay groups either. The teachers I did find, teach either jewellery and bead making, canning, flower making and one or two who teach various model making or sculpting. I plan to be a little different.
I am planning to run classes for 8 people at a time. They will pay for one lesson a few hours long, rather than a long course, but I also plan to run a much larger clay group, which I will explain more about at the end.
Lessons
I will start the lessons the same, with showing how to use the clay and tools properly.
The main body of the lesson will have several options. I am making worksheets that are the step by step process to make different items. Each step will have a photo and a explanation. The help sheets are divided into two types;
1) Design
How to make a type of pattern or effect with the clay.
2) Project
How to make a home decor item from clay, either patternedor plain. These will be things like bud vases, little boxes, tea lights, decorative bowls etc.
I know that I will need to have all 8 students working from the same 2 cards, but I am not sure how I am going to do this. These are the options, let me know which one you think is best;
1) The democratic option
Once 8 people have signed up, allow them to vote between them.
The benefits to this is that I can run a class as soon as I have 8 people. The down side is if someone want to do one in particular and it doesn't get voted for.
2) Advertise them as different courses
I would permanently pair the designs and the projects and then advertise each option as individuals classes. When I get 8 people I run the course.
The benefit to this, is that everyone gets what they want. The downside is that it will take a lot longer to get 8 people who want to do that specific course, so it would make organising the dates for the class very difficult.
3) Cycle the lessons
This is my least favourite option. Like before, I pair off the designs and projects, I then run each pair one after the other.
The reason why this is my least favourite option, is that I really am not sure how to deal with it if I have too few people who sign up for the class.
So....
I will need at least 6 people attending in order for me to make it so that I make any money for my time.
I have already bought all the tools and equipment needed to teach 8 people, so that I know that I will definitely be doing this as soon as I am well enough.
Clay group
As I said, there is no clay groups going on locally, the nearest is London.
One of the first places I checked was with The British Polymer Clay Guild. Since they had nothing in Surrey, I have decided that I am going to do it myself.
A lot of the different guild groups organise tutors for each of their meetings and charge £10+ for members to attend the meeting/ lesson, but I as usual want to do it different.
My plan is that everyone comes along and works on their own thing in a social environment. I will keep a loose eye on things and help anyone who wants some help, but I will not be a tutor.
I will be happy to supply the clay (which I will sell to people at the price I got it. They will get to use my tools on a "you damage any, you replace it" basis, but it will be encouraged for them to bring their own.
Doing it this way, all people would need to pay, is enough to cover the room between them. If I get a church hall or scout hut, then this should be very cheap.
This really would be me on my own time, organising a social event for like minded people to have fun claying around.

I make home décor items from Polymer clay and sell them on Etsy. This blog is to let you get to know me, learn how I make my creations and keep up with everything I am doing with my business. Please feel free to comment, send me a message or share any of my work with your friends.
Showing posts with label tools. Show all posts
Showing posts with label tools. Show all posts
Sunday, 16 October 2016

Tuesday, 4 October 2016
My tools for polymer clay sculpting
I want to start by saying that the best tool you could have, are your hands. For a long time, this was all I had and I made some great pieces like this.
My work tray;
All of my most used tools are either kept on the tray I work from, with a glass chopping board that has lots of useful measurements.
I plan to buy a turntable when I can afford a decent one.

Tool box and clay storage box
My less frequently used tools, texture sheets and stamps, are kept in my beautiful red old fashioned metal tool box. Next to this is a plastic tub that I keep all my 350g bars of clay. My pasta machine also lives with them.


Mica powder
I have a tub that I keep all my mica powder, a few brushes, dust mask and some information leafletson mica powder.

Varnishing kit
My varnishing kit is kept in the conservatory. This includes; a strong sack cut open that I use as a cover (I drip varnish even when I am being careful), rubber gloves, kitchen roll, brushes, varnish (a small amount in a glass jar, from the larger tin), trays to put my bits to dry and white spirit and washingup liquid for cleaning.

Photography kit
My photography kit actually folds up flat. I keep the tape measurespermanently stuck to the back. I keep the 50p with the set.
I plan to buy a few more lights when I get the funds. I need to figure out a way to get a top that has bright lights shining down. I like LEDS.

Pasta machine
My pasta machine. I only use the back flat roller bit. This is very useful if you want a sheet of clay that is a uniform thickness.
This is just a cheap one. I am wanting a particular one that is available for lots of money. It is wider with longer legs (so it doesn't all fold up in the bottom) and it is motorised, so no struggling with turning the handle. Mmmm one day my precious, you will be mine!

Bits for shaping
I have various different bits that I have found lying around the house, that I use to help me with shaping some of the things I create.

Tissue blades
These are tissue blades. They come in flexible, ridged and crinkle. I tend to bake a bit of clay on the corner of the blunt side, so that I don't accidentallypush down on it only took find that I had it sharp side up.

Craft knifes
I also have a few craft knifes. You really need both types of knifes/ bades.
Canyou believe that there is a type of clay gilotine that I am craving. It is amazing, you can get very accurate slices.

Wooden handled tool set
I call this lot, my wooden handled tool set. This lot all came as one set. There are quite a few doubles, so I make sure that I have one of all the different heads on my tray and the rest go in the red toolbox.
The last tool on the right, was not in the set. It is a felting needle. It's a lot finer tip than you would get on the other pointed tools.

Metal handled tool set
I call this lot my metal handled tool set. This was several different sets that I merged into one. I keep most of them on the tray. The few that I don't, live in the toolbox.
The first 8 are a really useful general shaping set. The next 5 are the tools dentists use to scrape your teeth (I was quite alarmed at the thought of this, as they are very sharp). The next 2 are thin wire bristles that are fanned out. This is good for fur and grass. The last 4 are a set of larger tools. Then, there is a little pair of scissors, a small screwdriver and some tweezers. These are my most used set.

Ball tool set
These are my ball tools. The blue lot and the plastic one are sugar craft tools. I keepthem all on my tray (except the plastic one) as I use them on everything I make. The list of things I use them on is huge, you will wonder how you lived without them.

Rolling pins
On to rolling pins. There are times when I really can't be bothered to get out the pasta machine and it takes time to clean it before I can put it away. This is when I love my rolling pin. I tend to use the one with the metal handle less because it's squeaky.

Palate knife set
Next is my palate knifes for smoothing. I keep 1st, 2nd, 4th 7th and 10th on my tray and the rest go in my toolbox.

Ceramic tiles
I have 6 plain white ceramic wall tiles. These are really important. I can use them as little work surfaces. Due to being weak and painful, I cannot have my work tray on my lap. I have it either at the end of the bed or more often, next to me on my husband's side.
When I make my boxes, I will put them on a baking tray with the lid on the tray next to it. I then put a tile on it. This keeps the lid flat throughoutthe bake. Without this, the corners tend to curl up a little.
I place a layer of them underneath everything I bake. This is because they help hold the heat at a constant temperature.


Improvised tools
This lot are my improvised tools. A comb as a spork are good for texturing. 3 different types of straws. These make good feathers when you press the slanted side into the clay. 3 types of wire brushes. These are good for texturing and for cleaning up the tools.
The next one is a metal rod that I surrounded in pink fimo. I then put a different sized eyelet in each side point in the clay, then baked it. This makes brilliant scale pattern. You can also use netting with mica powder. I plan to make a similar tool, but around 20 pins will be mounted one side and 5 the other.
Then it's the serrated strip from a aluminium foil box. Lastly are various brushes. The last is a test tube brush, it's very useful for cleaning clay from hard to reach places.

Other miscellaneous tools
The 9 flat steel shapes are used as another option for smoothing. Then there are 2 glass coasters, see my post on making canes for the use. Then, below that is a clay extruder and a bag of the plates with the different shaped holes. Under these are metal knitting needles. I use these with kitchen roll to clean out my pasta machine.
We are then going right from the coasters, to the 3 wooden handled tools for making holes. The colourfulpack next to this are tools for making various sizesof small holes. The silver things below, pinch the clay into a few different shapes, I was very underwhelmed by them. Lastly are 2 different types of crinkle cut chip slicers. They work far better than the crinkledlong blade.

Texture sheets and rubber stamps
Texture sheets are made from transparent plastic, they are things like a cobble stone effect, dots, wavy lines, weaved, checkered ect. I have also found lots of packaging has interesting texture design. You can make your own with bits of plastic that you have drawn your design with a glue gun. I will get one eventually.
This is my very small collection of rubber stamps. I am not buying more because I am holding out for my father to retrieve my mum's big collection. They went into storage when she died a few years ago.

Alphabet moulds
These are the only moulds I will use.

Last few bits
A set of small clay chisels. Some small shape cutters. Liquid fimo (this is used for loads of different things, there are lots of tutorials online devoted to it). Fimo softener is great! You put a little of it with your clay if you feel it has gone too dry and crumbly. Kneed / condition it into the clay to bring it back to good. Last of all, is the measuring guide produced by Fimo.

My work tray;
All of my most used tools are either kept on the tray I work from, with a glass chopping board that has lots of useful measurements.
I plan to buy a turntable when I can afford a decent one.

My less frequently used tools, texture sheets and stamps, are kept in my beautiful red old fashioned metal tool box. Next to this is a plastic tub that I keep all my 350g bars of clay. My pasta machine also lives with them.

Small clay pots
I keep a smaller amount of each of the clay colours in their own tupperwair pots. I was exceedingly lucky to find a box that fit them all so perfectly. Unfortunately it has got quite tatty from a year's use.

Mica powder
I have a tub that I keep all my mica powder, a few brushes, dust mask and some information leafletson mica powder.

Varnishing kit
My varnishing kit is kept in the conservatory. This includes; a strong sack cut open that I use as a cover (I drip varnish even when I am being careful), rubber gloves, kitchen roll, brushes, varnish (a small amount in a glass jar, from the larger tin), trays to put my bits to dry and white spirit and washingup liquid for cleaning.

Photography kit
My photography kit actually folds up flat. I keep the tape measurespermanently stuck to the back. I keep the 50p with the set.
I plan to buy a few more lights when I get the funds. I need to figure out a way to get a top that has bright lights shining down. I like LEDS.

Pasta machine
My pasta machine. I only use the back flat roller bit. This is very useful if you want a sheet of clay that is a uniform thickness.
This is just a cheap one. I am wanting a particular one that is available for lots of money. It is wider with longer legs (so it doesn't all fold up in the bottom) and it is motorised, so no struggling with turning the handle. Mmmm one day my precious, you will be mine!

Bits for shaping
I have various different bits that I have found lying around the house, that I use to help me with shaping some of the things I create.

Tissue blades
These are tissue blades. They come in flexible, ridged and crinkle. I tend to bake a bit of clay on the corner of the blunt side, so that I don't accidentallypush down on it only took find that I had it sharp side up.

Craft knifes
I also have a few craft knifes. You really need both types of knifes/ bades.
Canyou believe that there is a type of clay gilotine that I am craving. It is amazing, you can get very accurate slices.

Wooden handled tool set
I call this lot, my wooden handled tool set. This lot all came as one set. There are quite a few doubles, so I make sure that I have one of all the different heads on my tray and the rest go in the red toolbox.
The last tool on the right, was not in the set. It is a felting needle. It's a lot finer tip than you would get on the other pointed tools.

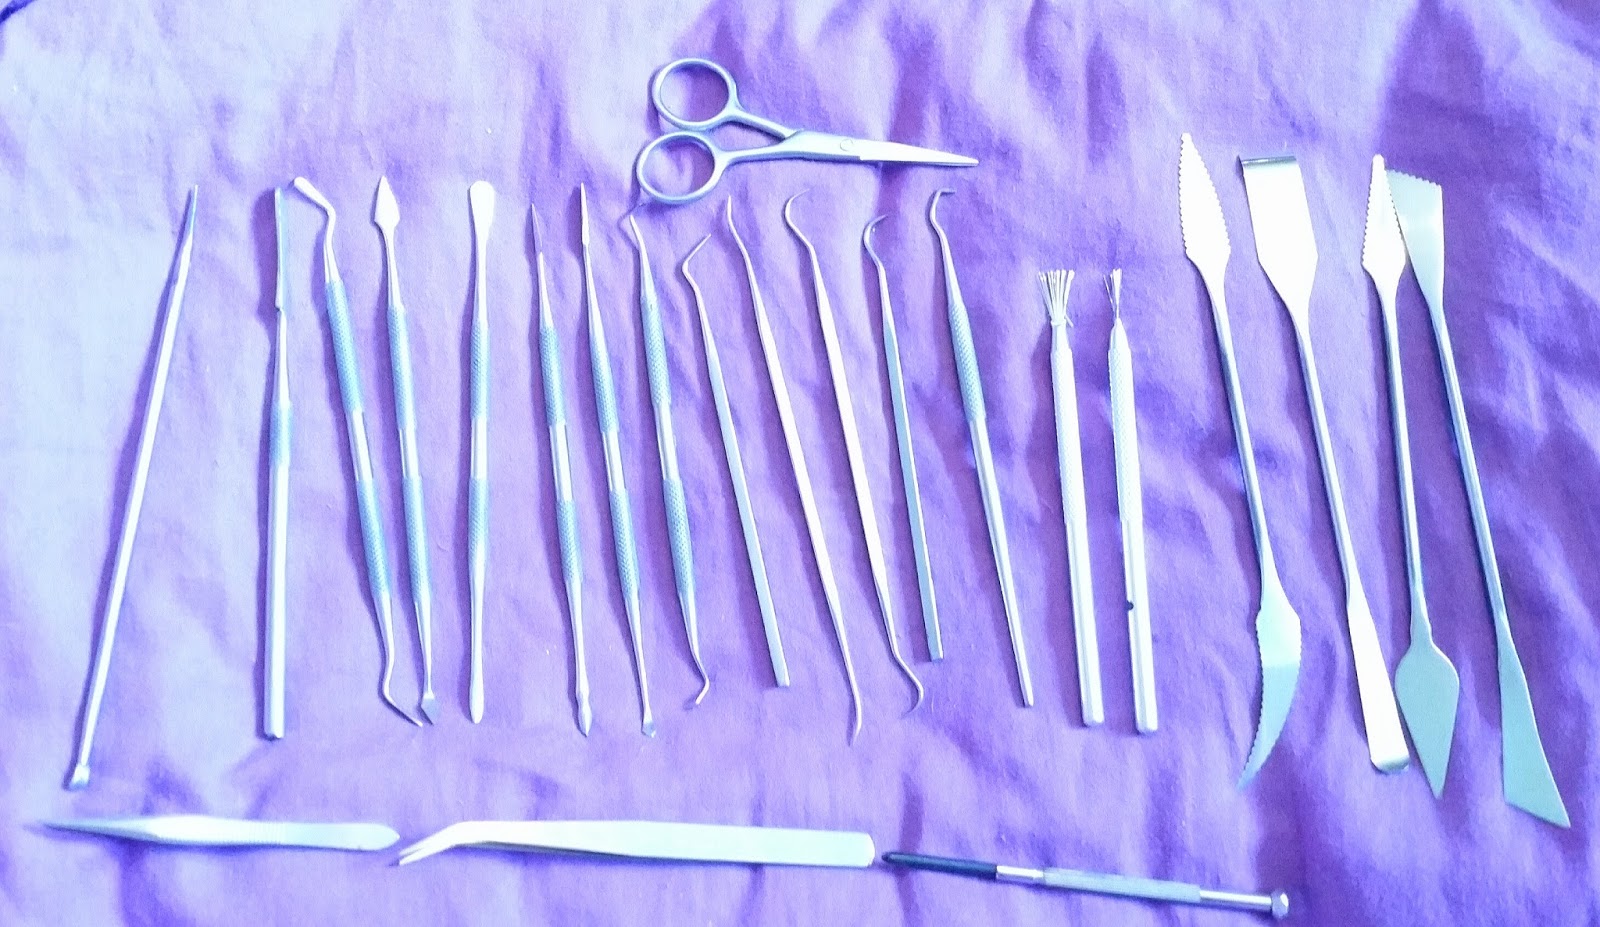
Metal handled tool set
I call this lot my metal handled tool set. This was several different sets that I merged into one. I keep most of them on the tray. The few that I don't, live in the toolbox.
The first 8 are a really useful general shaping set. The next 5 are the tools dentists use to scrape your teeth (I was quite alarmed at the thought of this, as they are very sharp). The next 2 are thin wire bristles that are fanned out. This is good for fur and grass. The last 4 are a set of larger tools. Then, there is a little pair of scissors, a small screwdriver and some tweezers. These are my most used set.
Ball tool set
These are my ball tools. The blue lot and the plastic one are sugar craft tools. I keepthem all on my tray (except the plastic one) as I use them on everything I make. The list of things I use them on is huge, you will wonder how you lived without them.

Rolling pins
On to rolling pins. There are times when I really can't be bothered to get out the pasta machine and it takes time to clean it before I can put it away. This is when I love my rolling pin. I tend to use the one with the metal handle less because it's squeaky.

Palate knife set
Next is my palate knifes for smoothing. I keep 1st, 2nd, 4th 7th and 10th on my tray and the rest go in my toolbox.

Ceramic tiles
I have 6 plain white ceramic wall tiles. These are really important. I can use them as little work surfaces. Due to being weak and painful, I cannot have my work tray on my lap. I have it either at the end of the bed or more often, next to me on my husband's side.
When I make my boxes, I will put them on a baking tray with the lid on the tray next to it. I then put a tile on it. This keeps the lid flat throughoutthe bake. Without this, the corners tend to curl up a little.
I place a layer of them underneath everything I bake. This is because they help hold the heat at a constant temperature.

Measuring tools
I keep a roofer's set square and a ruler for measuring. I plan to get a spirit level (a decent sized one) and a set of calipers.

Plyers and tin snips
A selection of needle nosed plyers, normal plyers and a pair of straight tin snips (the left an right ones were not where they should have been, I will hunt them down later).

Miscellaneous things you use
Aluminium foil for armetures and to cover bits I am baking, greaseproof paper because clay is sticky, various thicknessesof florist wire and a roll of crafting wire. Lastly a bag of uncooked rice. You can fill space with this while it's baking, so that it can hold its shape.
I want to get a sheet of tin, as this would help me with structural stability.

Rubber smoothing tool set
These are rubber tiped smoothing tools. Once you have taken all the rubber heads off and superglued them back on, they are very useful. I do also use the ball tools for smoothing as well.
Improvised tools
This lot are my improvised tools. A comb as a spork are good for texturing. 3 different types of straws. These make good feathers when you press the slanted side into the clay. 3 types of wire brushes. These are good for texturing and for cleaning up the tools.
The next one is a metal rod that I surrounded in pink fimo. I then put a different sized eyelet in each side point in the clay, then baked it. This makes brilliant scale pattern. You can also use netting with mica powder. I plan to make a similar tool, but around 20 pins will be mounted one side and 5 the other.
Then it's the serrated strip from a aluminium foil box. Lastly are various brushes. The last is a test tube brush, it's very useful for cleaning clay from hard to reach places.

Other miscellaneous tools
The 9 flat steel shapes are used as another option for smoothing. Then there are 2 glass coasters, see my post on making canes for the use. Then, below that is a clay extruder and a bag of the plates with the different shaped holes. Under these are metal knitting needles. I use these with kitchen roll to clean out my pasta machine.
We are then going right from the coasters, to the 3 wooden handled tools for making holes. The colourfulpack next to this are tools for making various sizesof small holes. The silver things below, pinch the clay into a few different shapes, I was very underwhelmed by them. Lastly are 2 different types of crinkle cut chip slicers. They work far better than the crinkledlong blade.

Texture sheets and rubber stamps
Texture sheets are made from transparent plastic, they are things like a cobble stone effect, dots, wavy lines, weaved, checkered ect. I have also found lots of packaging has interesting texture design. You can make your own with bits of plastic that you have drawn your design with a glue gun. I will get one eventually.
This is my very small collection of rubber stamps. I am not buying more because I am holding out for my father to retrieve my mum's big collection. They went into storage when she died a few years ago.

Alphabet moulds
These are the only moulds I will use.

Last few bits
A set of small clay chisels. Some small shape cutters. Liquid fimo (this is used for loads of different things, there are lots of tutorials online devoted to it). Fimo softener is great! You put a little of it with your clay if you feel it has gone too dry and crumbly. Kneed / condition it into the clay to bring it back to good. Last of all, is the measuring guide produced by Fimo.

Subscribe to:
Posts (Atom)