Thursday, 3 November 2016

The UK government wants disabled people to do what work they can. This is what happens if that is under 30 hours a week. Spoiler alert, it's awful.

I have been disabled with chronic fatigue syndrome and a load of other health problems for the past 16 years . I totally agree with the idea that we should all be doing what work we can,  so 2 years ago, I started that quest. 

I tried a few hours a week in a local office and got very ill. After a lot of failure, I decided that the only option was to become self employed. 

I work from my bed making polymer clay items and sell them on etsy.  I manage to work around 10 hours a week from my bed. 

I am able to do this under the supported Permitted Work rules.

Supported Permitted Work and Permitted Work rules

The following has been cut from the UK official government website on this.

Claiming ESA if you work

Your ESA isn’t usually affected if you either:
  • earn up to £20 a week
  • work for less than 16 hours a week and earn up to £115.50 a week, for 52 weeks or less (or for any length of time if you’re in the support group)
This is called ‘permitted work’.
You can also do ‘supported permitted work’ and earn up to £115.50 a week. This must be part of a treatment programme, or supervised by someone from a local council or voluntary organisation whose job it is to arrange work for disabled people.
You must tell the Department for Work and Pensions (DWP) if you start doing permitted or supported permitted work. They’ll send you form PW1 to fill in and send back to them.
Any volunteer work you do needs to be reported. It normally doesn’t affect your ESA.

 My problem with this 

I have put all my savings into tools and materials, but the benefits system will not look at profit.  They look at income.  So, the fact that over half of what is paid goes in materials and postage does not matter,  it all is held against me. 

This leaves me walking a very thin tightrope.  I have to try and build my business all by myself, to a point where I am not in the red and I am earning enough to stop calming. But at no point, can I have  any income of over £100 per week  (they do not average it out,  so if I sell well in the Christmas period and sell nothing from January to April, it doesn't matter.  If I go over it in any one week, I am screwed).

I feel like I am living under a constant threat of having to fold the business and loose a lot of money. 

Also the rules state that I have to be on the books of a company that is approved to fulfil the "supported" part of the conditions. There are very few of these. In Surrey  (where I live) there is one.  Employability. They are swamped and if you can't get them to take you or they drop you at any time, I either have to stop working or stop calming.  

You are only allowed to work for 52 weeks otherwise. 


You need to be able to work  30 hours a week for tax credits, so no chance of help there.

This is what they do when you actually do what they ask.

Uk Insurance for a clay artist. Clearing up some of the confusion

I know that a lot of people work without any insurance, feeling like they are too small to need it.

Whenever I break any rules in life, I always get caught  (I bunked on day of school in my whole life and got caught out and have a long list like this). I also think that it is important to protect your customers.

Public liability insurance 

Most craft sellers know that we need public liability insurance, if we sell at fairs or in shops.

This insurance covers any member of the public against injury in any of your work spaces. It doesn't cover you or your staff.

Product liability insurance 

This one is less known about, but just as important.  If someone hurts themselves on something that you made  (like a kid swallowing a bit that broke off a model,  or cut themselves on a sharp edge ect) your public liability insurance will not cover this.

Personal / staff insurance 

This will cover you / your staff if you get too ill to work or injured.

I don't have any staff, so I haven't really looked into this. I think that you have to have this if you have staff, but personal cover is not mandatory.

I have chosen not to until I get my business to the stage where it is financially stable enough to come off benefits.

Do remember, if you choose to not cover yourself,  to put some money aside for sick pay for yourself. You will need it at some point and the lack of this has ended many businesses. Finding that you can no longer afford to pay your bills, is a living hell.

Stock and tool cover 

This is what it sounds like and another one that is not mandatory,  but you are a fool to not have it.

You are counting all the items you have made ready to be sold, all the materials you keep to make things  (clay, crystals, armatures etc), all the equipment used to desplay at fairs, the tubs and shelves ect that you use to store everything, all the packaging for postal and any stamps for postage, every tool you have for your work. Literally everything you use for work.

Keep a list of everything you have,  what it cost with pictures and receipts off of your work premises.  Give them to a friend or relative or store them digitally somewhere else. If your workplace is destroyed, you don't want that paperwork to go too as you are going to need it. Make sure it's up to date.

Premises insurance 

This one depends on how you work. I work from home and don't have a actual shop  (I sell on the Internet or at the few fairs that I am well enough to get to). I also store my stock around my home  (instead of at a warehouse). So, I don't think this is applicable for me at the moment.

If you do have a studio that you work in or a shop where you sell your work or somewhere you keep your stock,  then you really want to get this.

When your things are somewhere unusual 

You may have some of your work at a gallery or exhibition at all sorts of places. You could have an arrangement with a shop to rent you a shelf, or start to store some tools and materials at a place where you teach. Anything that is different from what you have told your insurance company.......

At the stage of negotiations and before you agree,  make sure you ask if they are covering your bits with their insurance and what they will not cover.  I ask for this in writing.

I have found that almost no one agrees to take any responsibility for these situations. You must then get in touch with your insurance company before you agree the deal. They may say that this is allowed under your current cover or say that it will cost extra. You can then bring this information into the negotiations.

If you don't inform your insurance upfront, you will not be covered. This is why I get a email from them stating coverage.

Tell your insurance everything 

All the job roles you perform, your method of sales and the country's you are available to buy in, what you expect to earn, just everything. Spend some time before getting in touch with them, to write down everything you think could possibly effect your policy. No matter how unlikely.

If anything changes throughout the year  (you sell more than you expect or do anything new) get in touch with them.

Make sure you have their phone number and email address saved.

Some stings 

There are several things I have come across, that made my eyebrows go up for different reasons. Here are the ones that I can think of, but please let me know ones that I have missed and I will add them.


  • Selling to America. UK insurance companies hate it and would rather you don't. It has a massive premium on it, that they divide into percentage of total sales.  I am in the bracket of no more than 25%. If I think I am getting close,  I have to get in touch to pay to go into the higher bracket. America has the reputation for a suing culture.  
    They seem to have no problem with you       selling to the rest of the world,  no matter     how bad their postal service or if they are     at war etc.

  • If you are found to be knowingly negligent, then you are on your own. 
  • They don't cover copy write disputes. 
  • They all have various excess you have to pay on a came.
  • They seem to charge you more in your first year, because all you have is a prediction of earnings.
  • If you call the mane companies that find you a quote twice and make sure that they don't use the same company as the fist serch, you can get a bidding war going on for your business. Really is woth the extra effort!
     You tell each company the same            
     information and inform them of the 
    other ones quote. I guarantee that they 
    will come back with a better offer. Mine 
    started at  £660 for the year and I am now     at a  £220 for the same cover.  I am about     to inform them that they have just been         undercut by the first again, so I will let           you know who wins me.

Be nice to your brokers 

These people are nice guys doing a complicated job  (even when you are not making them work far harder with the bidding war). Remember to be nice to them both. 

I have a rule that if I get a good service from someone, then I email their boss to say so. They are all going to have a end of year appraisal and their boss will have all the complaints lodged that year. We are all good at complaints  (as we should be if something was wrong), but we do not leave positive feedback. It is actually just as important.

Where I went for my insurance 

The first company that I went to, to get the 2 different insurance brokers was;

BIBA Commercial (British Insurance Brokers’ Association)

https://www.biba.org.uk/find-insurance


They put me in touch with;

1) J.M. Glendinning; 


https://www.jmginsurance.co.uk/business-insurance

2) Towergate Insurance Brokers;

https://www.towergateinsurance.co.businessuk/-insurance

Monday, 17 October 2016

Fimo is not poisonous (Polymer clay)

One of the most pervasive myths about polymer clay, is that it is poisonous.  I am telling you now that it is not.

How this myth got started 

I have heard that it was spread around by the first generation of polymer clay artists, because they saw that the clay was so perfect that the market could very easily get flooded with competition.

There is no actual proof of this that I have seen and even if it is true,  they where not successful. There are tones of excellent artists selling their creations.

I think it is more likely that it was a combination of the fact that it is a plastic and the fact that responsible sellers say  ( like I do in my literature) that their clay products are not to be in contact with food or drink.  When you put clay on the outside of glass or ceramic,  it's OK. Here is why we say this;

If you put baked clay under a microscope,  you will find it has a pitted surface.  This means that it is hard to get the surface germ free.  See porous, not poisonous.

But what about the fumes when you bake it? 
While it does omit a slight chemical smell while baking, fumes is really far too dramatic a word.

If you chose to spend the whole day huffing them,  you would have no effect other than waisted time. If you don't like the smell in your oven,  simply cover the tray with foil.

Certified safe for children 
 Above is a pack of Fimo.  If you look in the bottom left corner,  you will see the symbol below.


The AP (Approved Product) Seal 

This identifies art materials that are safe and that are certified in a toxicological evaluation by a medical expert to contain no materials in sufficient quantities to be toxic or injurious to humans, including children, or to cause acute or chronic health problems. Such products are certified by ACMI to be labeled in accordance with the chronic hazard labeling standard, ASTM D 4236, and the U. S. Labeling of Hazardous Art Materials Act (LHAMA).


And finally....
The last bit that should convince you.  I  have eaten Fimo myself and I am fine. 

I do my clay work from my bed and I also have a snack supply (some healthy and some naughty). I have lost count of the amount of times that I dropped a bit of chocolate and found brown clay. I  know my mistake only by the fact that it basically is tasteless. 

So let your kids loose on some Fimo.  You will then get to treasure their creativity forever. 

Sunday, 16 October 2016

Why I want to be a polymer clay teacher

If you decided that you liked to mess around with polymer clay,  you might consider methods to learn more about it. While there are a range of books out there  (your local library will have some), online tutorials, websites, if you encounter any problems then you are left asking around on forums.

So, it is worth paying for lessons.  There are some who run online courses and others who teach in person.  I am planning to become the latter.

My main reason for wanting to become a teacher,  is actually to get to know new people. I know that there are a lot of teaching roles where you are not allowed to make friends with the students, but since this is a adult teaching adults and there is not any big power difference,  then this is fine.

Having a lot of long term health problems prevent me from getting out and about, so I don't get to meet people that way. Since I work for myself from home,  that takes away all the people who we meet through work.  I am not Billy no mates by any means, but I think I really need to work at that part of my life.

I have looked around the UK and found that there are quite a few teachers out there, but none of them are in Surrey and there is no clay groups either.  The teachers I did find, teach either jewellery and bead making,  canning, flower making and one or two who teach various model making or sculpting. I plan to be a little different.

I am planning to run classes for 8 people at a time. They will pay for one lesson a few hours long, rather than a long course,  but I also plan to run a much larger clay group, which I will explain more about at the end.

Lessons 

I  will start the lessons the same,  with showing how to use the clay and tools properly.

The main body of the lesson will have several options. I am making worksheets that are the step by step process to make different items.  Each step will have a photo and a explanation. The help sheets are divided into two types;

1) Design
How to make a type of pattern or effect with the clay.

2) Project 
How to make a home decor item from clay, either patternedor plain. These will be things like bud vases, little boxes, tea lights, decorative bowls etc.

I know that I will need to have all 8 students working from the same 2 cards, but I am not sure how I am going to do this.  These are the options,  let me know which one you think is best;

1) The democratic option 
Once 8 people have signed up,  allow them to vote between them.

The benefits to this is that I can run a class as soon as I have 8 people.  The down side is if someone want to do one in particular and it doesn't get voted for.

2) Advertise them as different courses
I would permanently pair the designs and the projects and then advertise each option as individuals classes. When I get 8 people I run the course.

The benefit to this, is that everyone gets what they want.  The downside is that it will take a lot longer to get 8 people who want to do that specific course,  so it would make organising the dates for the class very difficult.

3) Cycle the lessons  
This is my least favourite option. Like before, I pair off the designs and projects,  I then run each pair one after the other.

The reason why this is my least favourite option,  is that I really am not sure how to deal with it if I have too few people who sign up for the class.

So....
I will need at least 6 people attending in order for me to make it so that I make any money for my time.

I have already bought all the tools and equipment needed to teach 8 people,  so that I know that I will definitely be doing this as soon as I am well enough.

Clay group
As I said,  there is no clay groups going on locally, the nearest is London.

One of the first places I checked was with The British Polymer Clay Guild.  Since they had nothing in Surrey,  I have decided that I am going to do it myself.

A lot of the different guild groups organise tutors for each of their meetings and charge  £10+ for members to attend the meeting/ lesson,  but I as usual want to do it different.

My plan is that everyone comes along and works on their own thing in a social environment.  I  will keep a loose eye on things and help anyone who wants some help,  but I will not be a tutor.

I  will be happy to supply the clay  (which I will sell to people at the price I got it.  They will get to use my tools on a "you damage any,  you replace it" basis,  but it will be encouraged for them to bring their own.

Doing it this way,  all people would need to pay, is enough to cover the room between them. If I get a church hall or scout hut,  then this should be very cheap.

This really would be me on my own time, organising a social event for like minded people to have fun claying around.

Thursday, 6 October 2016

My Christmas range so far

I have always found that the majority of Christmas decorations are all the same basically and I wanted to offer something different.  I like to use animals that are not associated with Christmas,  but make them have a Christmas theme.

Tree decorations 
These are what is left from last year,  but I plan to make more shortly.


 A sheep wearing a raindear's horns on a headband and a red rouldolph nose.

 Penguins in red party hats.

 Bats holding Christmas stars.

 Stegosaurus in santa hats.

Siameese cats in Christmas stockings.

Rabbits holding a big carrot shaped present, with fairy lights tangled round them.

 Elephants holding Christmas presents.

 Ginger tabby cats playing in a holly wreath  (this is my favourite).

 Hedgehogs holding Christmas presents.

Grey tabby cats holding Christmas puddings.

Swans with Christmas puddings on their backs.

I am planning on octopus with paper chains,  a lion with a roast turkey, polar bears with mince pies, hippos with a Christmas ballball in their mouths,  a badger with a candy cane and squirrelswith bowls of nuts.

I have no idea if I will manage them all, but I can always make more next year.

Christmas boxes 
I have made a couple of boxes for the shop.  They are swirling Christmas colours, with a Christmas tree on top.  All but one have cats on them.

I have had many criticisms of these.  That they are too loud and busy, but this is how I see Christmas. I understand that they are not for everyone,  but no art should be. I  make things that hold meaning to me, things that make my heart leap. If I don't love it,  I will not sell it.

A black cat sitting near to the tree.  The box is Christmas tree shaped.

 A grey cat sitting near the tree.  The box is Christmas tree shaped.

A tree (no cat) on a star shaped box.

 A grey cat playing with the tree.  The box is Christmas tree shaped.

There was a tree shaped box with a black cat playing with the tree,  but  it has gone to its forever home and I can't find its picture.

Kind of Christmasy 
There are several bits I have made that I don't think would look out of place in a Christmas setting,  but where not made with Christmas in mind.  Well, see what you think......


It has a snowman, but I really had no idea when I started, that I was going to make this.  I  don't usually work with such little plan,  but I am very pleased with how it has turned out.

This is my arctic box. I agree that I am really stretching it here,  but it has ice and I have seen many people who go for the light blue, silver and white colour scheme for their Christmas decorations.

I  personally go for purple (my favourite colour), magenta, turquoise and silver. Not really Christmas colours,  but I have never had a problem with getting copious amounts of bits in these.

Tuesday, 4 October 2016

My tools for polymer clay sculpting

I want to start by saying that the best tool you could have,  are your hands.  For a long time,  this was all I had and I made some great pieces like this.

My work tray;
All of my most used tools are either kept on the tray I work from,  with a glass chopping board that has lots of useful measurements.

I plan to buy a turntable when I can afford a decent one.

Tool box and clay storage box 
My less frequently used tools, texture sheets and stamps, are kept in my beautiful red old fashioned metal tool box.  Next to this is a plastic tub that I keep all my 350g bars of clay.  My pasta machine also lives with them.


Small clay pots 
I keep a smaller amount of each of the clay colours in their own tupperwair pots.  I was exceedingly lucky to find a box that fit them all so perfectly. Unfortunately it has got quite tatty from a year's use. 


Mica powder 
I have a tub that I keep all my mica powder,  a few brushes, dust mask and some information leafletson mica powder.


Varnishing kit 
My varnishing kit is kept in the conservatory.  This includes; a strong sack cut open that I use as a cover  (I drip varnish even when I am being careful), rubber gloves, kitchen roll, brushes,  varnish (a small amount in a glass jar, from the larger tin), trays to put my bits to dry and white spirit and washingup liquid for cleaning.


Photography kit
My photography kit actually folds up flat. I  keep the tape measurespermanently stuck to the back.  I keep the 50p with the set.

I plan to buy a few more lights when I get the funds. I need to figure out a way to get a top that has bright lights shining down.  I  like LEDS.

Pasta machine 
My pasta machine.  I only use the back flat roller bit.  This is very useful if you want a sheet of clay that is a uniform thickness.

This is just a cheap one.  I am wanting a particular one that is available for lots of money.  It is wider with longer legs  (so it doesn't all fold up in the bottom) and it is motorised, so no struggling with turning the handle. Mmmm one day my precious, you will be mine!


Bits for shaping 
I have various different bits that I have found lying around the house, that I use to help me with shaping some of the things I create.


Tissue blades 
These are tissue blades.  They come in flexible,  ridged and crinkle. I tend to bake a bit of clay on the corner of the blunt side, so that I don't accidentallypush down on it only took find that I had it sharp side up.


Craft knifes 
I also have a few craft knifes.  You really need both types of knifes/ bades.

Canyou believe that there is a type of clay gilotine that I am craving.  It is amazing, you can get very accurate slices.


Wooden handled tool set
I call this lot,  my wooden handled tool set.  This lot all came as one set.  There are quite a few doubles,  so I make sure that I have one of all the different heads on my tray and the rest go in the red toolbox.

The last tool on the right,  was not in the set.  It is a felting needle.  It's a lot finer tip than you would get on the other pointed tools.


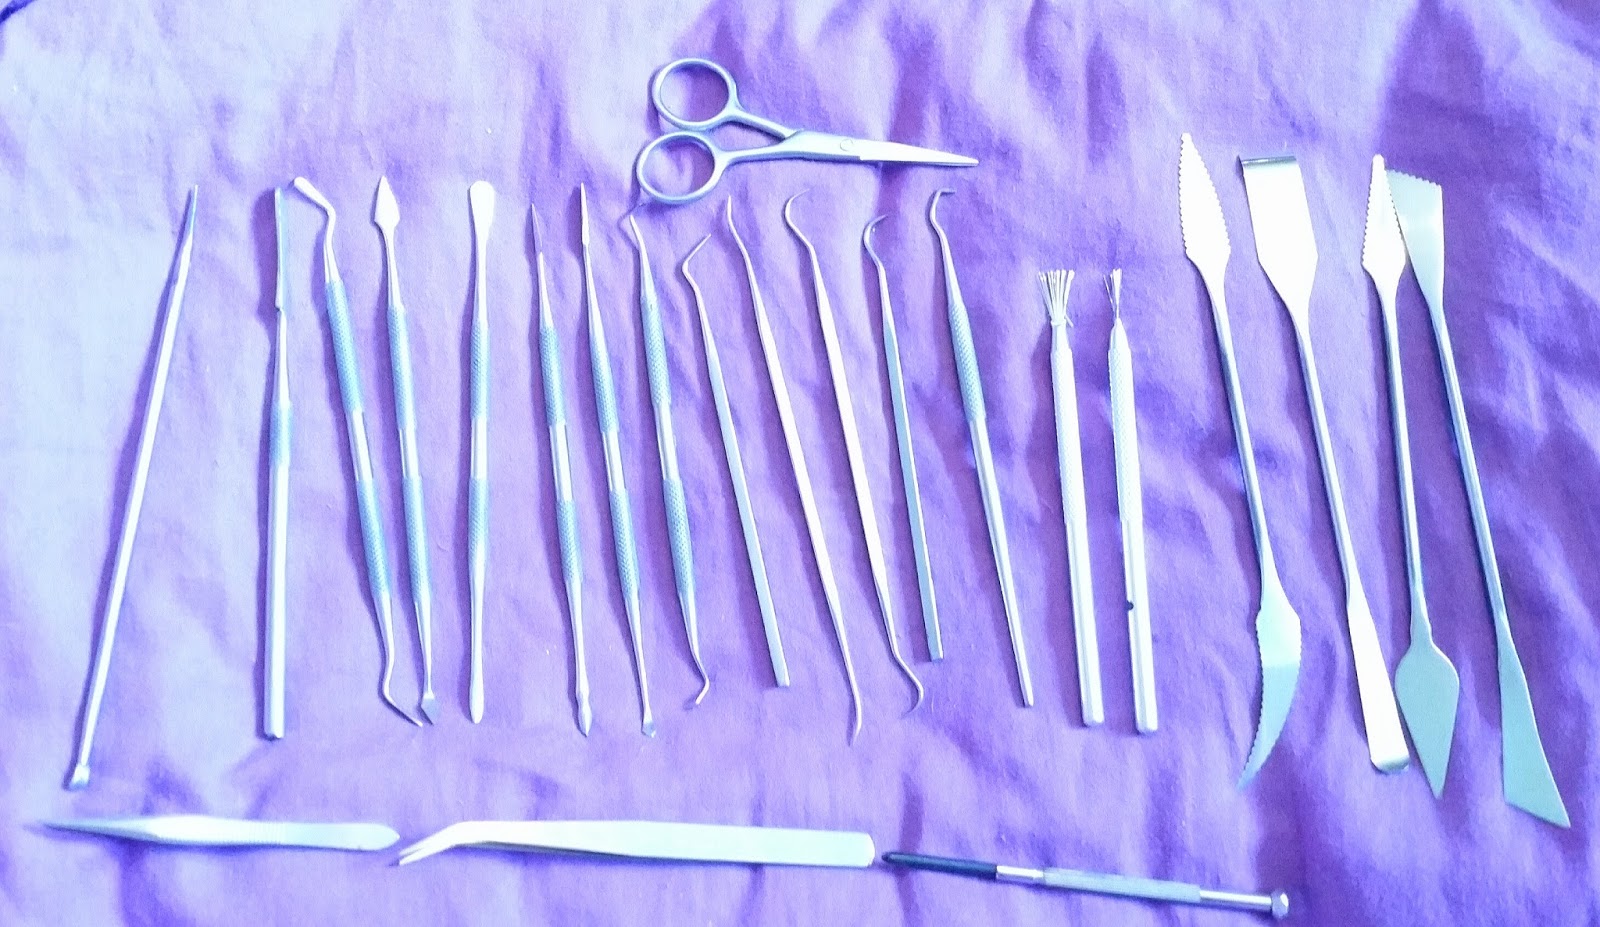
Metal handled tool set 
I call this lot my metal handled tool set.  This was several different sets that I merged into one. I keep most of them on the tray.  The few that I don't,  live in the toolbox.

The first 8 are a really useful general shaping set. The next 5 are the tools dentists use to scrape your teeth  (I was quite alarmed at the thought of this,  as they are very sharp). The next 2 are thin wire bristles that are fanned out.  This is good for fur and grass.  The last 4 are a set of larger tools. Then, there is a little pair of scissors, a small screwdriver and some tweezers. These are my most used set.


Ball tool set 
These are my ball tools.  The blue lot and the plastic one are sugar craft tools. I keepthem all on my tray  (except the plastic one) as I use them on everything I make.  The list of things I use them on is huge, you will wonder how you lived without them.


Rolling pins
On to rolling pins. There are times when I really can't be bothered to get out the pasta machine and it takes time to clean it before I can put it away. This is when I love my rolling pin.  I tend to use the one with the metal handle less because it's squeaky.


Palate knife set
Next is my palate knifes for smoothing. I keep 1st, 2nd, 4th 7th and 10th on my tray and the rest go in my toolbox.


Ceramic tiles 
I have 6 plain white ceramic wall tiles. These are really important.  I can use them as little work surfaces. Due to being weak and painful, I cannot have my work tray on my lap. I have it either at the end of the bed or more often, next to me on my husband's side.

When I make my boxes, I will put them on a baking tray with the lid on the tray next to it. I then put a tile on it.  This keeps the lid flat throughoutthe bake.  Without this, the corners tend to curl up a little.

I place a layer of them underneath everything I bake.  This is because they help hold the heat at a constant temperature.


Measuring tools 
I keep a roofer's set square and a ruler for measuring.  I plan to get a spirit level  (a decent sized one) and a set of calipers. 


Plyers and tin snips 
A selection of needle nosed plyers, normal plyers and a pair of straight tin snips  (the left an right ones were not where they should have been, I will hunt them down later).


Miscellaneous things you use 
Aluminium foil for armetures and to cover bits I am baking,  greaseproof paper because clay is sticky, various thicknessesof florist wire and a roll of crafting wire. Lastly a bag of uncooked rice.  You can fill space with this while it's baking,  so that it can hold its shape. 

I want to get a sheet of tin, as this would help me with structural stability.


Rubber smoothing tool set
These are rubber tiped smoothing tools.  Once you have taken all the rubber heads off and superglued them back on,  they are very useful.  I do also use the ball tools for smoothing as well.


Improvised tools
This lot are my improvised tools.  A comb as a spork are good for texturing.  3 different types of straws.  These make good feathers when you press the slanted side into the clay. 3 types of wire brushes.  These are good for texturing and for cleaning up the tools.

The next one is a metal rod that I surrounded in pink fimo. I then put a different sized eyelet in each side point in the clay, then baked it.  This makes brilliant scale pattern.  You can also use netting with mica powder. I  plan to make a similar tool,  but around 20 pins will be mounted one side and 5 the other.

Then it's the serrated strip from a aluminium foil box.  Lastly are various brushes.  The last is a test tube brush, it's very useful for cleaning clay from hard to reach places.


Other miscellaneous tools 
The 9 flat steel shapes are used as another option for smoothing. Then there are 2 glass coasters,  see my post on making canes for the use. Then, below that is a clay extruder and a bag of the plates with the different shaped holes. Under these are metal knitting needles.  I  use these with kitchen roll to clean out my pasta machine.

We are then going right from the coasters, to the 3 wooden handled tools for making holes. The colourfulpack next to this are tools for making various sizesof small holes.  The silver things below, pinch the clay into a few different shapes,  I was very underwhelmed by them. Lastly are 2 different types of crinkle cut chip slicers.  They work far better than the crinkledlong blade.


Texture sheets and rubber stamps 
Texture sheets are made from transparent plastic,  they are things like a cobble stone effect,  dots, wavy lines, weaved, checkered ect. I have also found lots of packaging has interesting texture design.  You can make your own with bits of plastic that you have drawn your design with a glue gun.  I  will get one eventually.

This is my very small collection of rubber stamps.  I  am not buying more because I am holding out for my father to retrieve my mum's big collection.  They went into storage when she died a few years ago.


Alphabet moulds 
These are the only moulds I will use.


Last few bits 
A set of small clay chisels. Some small shape cutters. Liquid fimo  (this is used for loads of different things, there are lots of tutorials online devoted to it). Fimo softener is great!  You put a little of it with your clay if you feel it has gone too dry and crumbly.  Kneed / condition it into the clay to bring it back to good.  Last of all, is the measuring guide produced by Fimo.

Monday, 3 October 2016

Charms. My problem with miniature sculpting.

Anyone who has been to my online Etsy shop,  know that I have a largerange of charms available;

Gina pigs, moles, dragons,cats, badgers, swans,  duck, butterflys, stegosaurus, dogs, lizards, penguins, hedgehogs, crocodiles, dolphins, turtles, owls, rabbits, bears, bees, fish, sheep, monkeys, horses, mice, ladybirds, pigs, squirrel, elephant, starfish and seahorse!


"Looks to me Carly, like you don't have any problems with miniatures,  so what's with the title?"

As I have mentioned a lot on previous posts, I have have Chronic fatigue syndrome and Fibro myalgia. This means that my arms and hands are always in pain at varying degrees and they are often shaking and weak.

Others may just take days like this off and I did,  but after 14 years off ill,  the plan is to find ways to do a little most days (around 10 hours a week in all, if I can). It took a year of trying other jobs and I have been a professional sculptor for a year.  So 16 years disabled.

I work from my bed, but I often have to use pillows to support my arms while I work laying flat.  Luckily,  my bed is 2 single mattresses pushed together.  This is far bigger than a king size double bed. I often have all my Husband's and my pillows and duvet almost like a cloth outline of support.

Even with all this, I find that there are only some things that I can manage. I am often having to move misplaced components and fixingdamage caused by my shaking.

The other issue that I have that really affects my abilities to do miniature work,  is the fact my left eye wanders off. The tendon that holds your iris where you want it, is very loose.  This means that it often goes to the left hand corner.

I have had this all my life. My brain compensates by using my right eye, but this causes me a lot of depth perception issues.  Dyslexia (also got this) has hand eye coordination issues and the brain fog of the CFS, all mix and cause an obstacle for my brain in giving me accurate sensory information.

Luckily for me,  clay is extremely forgiving. While raw,  it is so easy to change.  You can pull it all over the place,  constantly fiddling.  If it gets too warm,  then it can go sticky,  but you either blot it on some paper or just whack it in the fridge for a few minutes  (I do the latter).

Once the clay has been baked, it is actually really easy to carve.  You can actually cut it with a craft knife. You can also sand it to remove blemishes.

I see all of this as a obstacle rather than a barrier, but I have to be realistic.  This is why I will not promise to make anything smaller than 3cm.

I know that there are many elements of the items I have made for the shop, that are smaller than 3cm.

The difference is that if I agree that I will make things that small on commission,  then if it turns out that it is one of the many things that I can't make in miniature, then I have broken my promise.  I want to be trustworthy and customer focused, so I have to make this rule.

There are tons of amazing artists who create incredible miniatures,  so the market will not miss me.